Mobile photography📷
Beginners guide to Mobile Photography- how to take breathtaking photos without a professional camera (Framing and Snapseed)
With the tremendous increase in people inclined towards social media and image sharing apps, better mobile cameras have become a key selling point for most mobile phones. There’s a huge demand for Camera Smart Phones and companies have come up with dual, triple camera setups, telephoto lenses, bokeh modes, portrait modes, AI selfies, and a lot more.
But honestly, any 2017 smartphone’s camera is more than enough in most conditions (except night time). So what is that makes the difference? Why is that some people get amazing photos from their mobile cameras and some just can’t? Trust me your phone camera can do a lot more than you think it can and so can you after reading this article.
It comes down to two simple things- Framing and post-processing.
This article is mainly aimed at naive users without any prior knowledge about photography. I’ll try and keep it as simple as possible and you’ll definitely become better after going through this and post better photos on Instagram, Snapchat, etc.
A lot of people have asked me about how I achieve such images using my phone and coincidentally I've been preparing for my Digital Image Processing semester exam and learned a lot about the technicality of photography, so I thought it’s high time I materialize it.
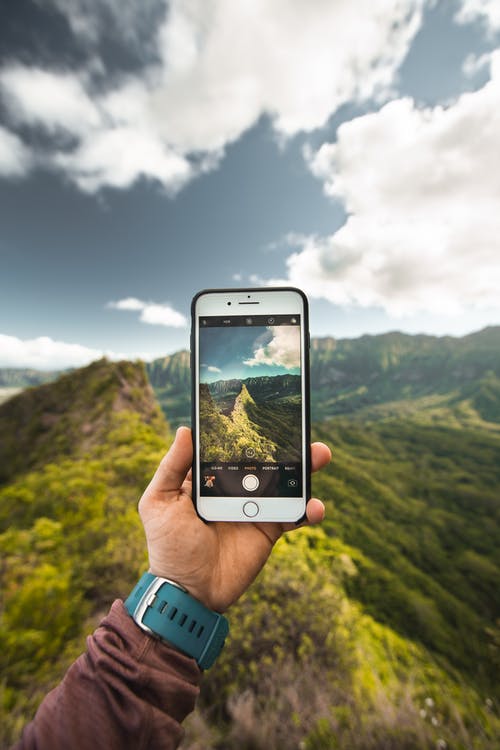
Before diving into the actual process, let me show you few photos I’ve shot with my Phone (Mi Redmi 4- 13MP, f/2.0) a ~100$ phone and processed in Google’s Snapseed app. All the photos in the article are shot using the same phone unless otherwise mentioned.
Disclaimer 1: None of the devices and apps mentioned in this article have paid me to do so, they’re solely my personal choice and opinion.
Disclaimer 2: I’m partially colorblind (Deuteranopia), which basically means I have trouble distinguishing between closer tones of colors(especially red-green). Excuse me if there is any error while talking about colors
You don’t need a Pixel 2 XL or an iPhone 10 (obviously they have better hardware and software, but you’re paying a premium), the best camera is the one which you have with you. Let’s dive into the process now.
Framing
Framing is the key to any photo, it is how you want people to see your photo but it is very subjective and can take a lot of time to understand and improve. Nonetheless here are a few tips on how to frame your photo better.
1. Symmetry:
Symmetry brings a lot of beauty to a photograph but can be quite challenging sometimes. The Taj Mahal photo shows some degree of symmetry, with the fountain places in the middle of the photo. To make it easier to find symmetry turn on grid-lines on your camera app. It basically divides the frame into 9 boxes (3x3).
Pro tip: Place the subject of interest on one of the intersections (where horizontal and vertical lines meet) as our eyes tend to focus first on these points. This is known as the rule of thirds.
2. Background and foreground:
Most smartphone cameras today have the ability to blur the background (even the ones with a single camera lens setup) which gives us more flexibility to differentiate between the foreground and the background. To do so, tap on the screen where the object is located in the frame.
.jpeg?alt=media&token=a04213e1-83a0-4cd5-879c-86f1da054d18)
Shooting a time-lapse,
Here, after opening my camera app, I tapped on the DSLR which appeared on the screen to change the focus on to it, the background was then blurred. Note that most cameras have a minimum focus distance and cannot focus on objects that are placed too close, in that case, move back a bit.
This pops the object in the foreground and gives it a nice look.
3. Shoot from a different angle:
Shooting from a new angle gives a whole new perspective and meaning to a photo, even if it’s of the same location. It is what makes a difference. It is something most people tend to not see.
For example, look at the below images: The one on the left is what most people see and click, but if you just point it upwards and try to shoot, you get a different (and most of the time, better) image. In case you are having trouble framing it, switch to the front camera (like I did to click this) and shoot it.
Don’t be lazy and try different positions ;)
Miscellaneous tips
If you’re shooting anything other than humans, always shoot in HDR (most camera apps have these options, just dig in your settings). HDR stands for High Dynamic Range. It is the ratio of the brightest light (“whitest white”) to the darkest shadows (“blackest black”) in a shot.
HDR mode basically shoots 3(or more) photos of varying exposure- one underexposed, one normal, one overexposed, and combines them to give a better image and a lot more details, an image closer to what the eye sees.
All of the above are quite subjective and depend majorly on the scene and your eye. But keep them in mind next time you shoot and trust me, you’ll have better-framed photographs.
Let us now look into a less subjective part- Post-processing.
Post-Processing
Oh wait, here’s the part which most people think is cheating, manipulating, etc. TL;DR, it’s not. Most cameras (especially phone cameras) are physically incapable of capturing exactly what you see(yes, there is the camera’s inbuilt post-processing algorithm, but at the end of the day, it’s an algorithm- a set of predefined instructions) so we have to change a few basic properties of the image to make it look like what it’s meant to be.
There are a ton of image enhancement apps available for both Android and iOS, personally I prefer Google’s Snapseed (snapseed apk download touch here)
It has a very neat UI, simple to use yet extremely powerful with loaded features. You can use any other app, what I am about to discuss are common and basic post-processing techniques that do the same thing to an image( Even Instagram has an inbuilt image editor). They only differ in the presets they have inbuilt. I’ll be using Snapseed for this tutorial.
.jpeg?alt=media&token=39bb7cbb-12a8-41f0-8ca1-7538fbc0f72f)
Next @
Click on Tools->Tune Image
Here, you’ll have a lot of options to play around with. I’ll be briefly explaining most of them.
1. Brightness
It is the overall lightness or darkness of an image. Adjusting it would make the image more bright or dark. Use this when the image is dark or too overexposed.
Left to right: Original image,brightness increased, brightness decreased
2. Contrast
Contrast is the difference in color and brightness which makes an object distinguishable. As you can see below, increasing the contrast increases the separation between dark and bright parts of the image, and decreasing does the opposite.
Left to right: Original image, contrast increased, contrast decreased
3. Saturation
Saturation is the amount of white light mixed with a hue( dominant color as perceived by an observed). Increasing saturation increases the separation between colors and vice versa. You get a punchier image if you increase the saturation.
Left to right: Original image, saturation increased, saturation decreased
4. Highlights
Highlights are usually the bright elements of an image, changing this property increases or decreases the intensity of these bright areas. Don’t confuse this with Brightness- which applies to the whole image, whereas Highlights only modifies specific parts.
Notice how the Hills are now more visible when the highlights have been decreased.
Left to right: Original image,highlights increased, highlights decreased
5. Shadows
Shadows are the exact opposite of highlights. When increased, they uncover the areas which were previously dark due to real shadows. Increasing shadows too much can introduce noise, since the image doesn’t contain much information about what is there.
Pro tip: If your camera supports shooting RAW format, which captures a lot more information ( like information about the image in shadows and highlights), use it, but it comes at a cost of larger image size (usually 5–6 times more)
Upload by sadeepa


0 comments: